How do you flush an airless paint sprayer?
Airless paint sprayers are popular tools used by professional painters and DIY enthusiasts alike for a smooth and efficient paint application
contact us nowprayers are popular tools used by professional painters and DIY enthusiasts alike for a smooth and efficient paint application. These sprayers utilize high pressure to atomize paint into a fine mist, resulting in a uniform coating on various surfaces. However, like any other equipment, airless paint sprayers require regular maintenance to ensure optimal performance. One crucial aspect of maintenance is knowing how to properly flush the sprayer after each use to prevent clogs and prolong its lifespan.
Flushing an airless paint sprayer is a simple yet important process that should be done after every painting job. Failure to do so can lead to dried paint residue in the system, which can result in uneven spray patterns and potential damage to the sprayer. By following these steps, you can effectively flush your airless paint sprayer and keep it in top condition for your next project.
Prepare for flushing
Before starting the flushing process, it is essential to gather all the necessary tools and materials. You will need clean water, a clean bucket, and safety equipment such as gloves and goggles. Additionally, ensure that you have access to a suitable location for flushing, preferably outdoors or in a well-ventilated area to prevent the inhalation of paint fumes.
Flush the system
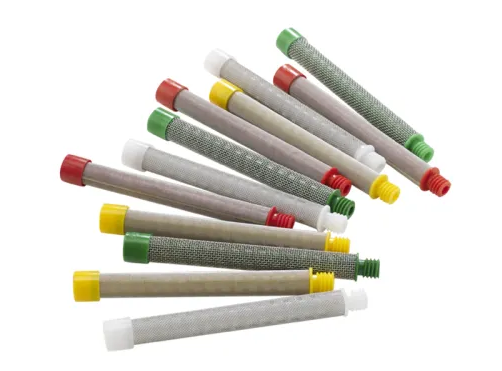
Start by relieving the pressure in the sprayer according to the manufacturer's instructions. Once the pressure has been relieved, remove the spray gun and any filters present in the system, such as airless spray gun filters, Graco Gun Filter, or Wagner Gun Filters. These filters can become clogged with paint residue over time, affecting the spray pattern and overall performance of the sprayer.
Next, pour clean water into the paint cup or container and reattach the spray gun to the sprayer. Turn on the sprayer and adjust the pressure settings to the recommended level for flushing. Point the spray gun into the clean bucket and squeeze the trigger to release the water through the nozzle. Continue spraying until the water runs clear and free of any paint particles.
Clean the filters
After flushing the system, it is essential to clean the filters thoroughly to remove any dried paint residue. Soak the filters in a cleaning solution or warm soapy water to loosen the paint, then rinse them under running water until clean. Allow the filters to dry completely before reinstalling them in the sprayer.
Perform a test spray
Once the system has been flushed and the filters cleaned, perform a test spray to ensure that the sprayer is working properly. Adjust the pressure settings and spray pattern as needed to achieve the desired results. If any issues persist, refer to the manufacturer's manual for troubleshooting tips or contact a professional for assistance.
By following these steps, you can effectively flush your airless paint sprayer and maintain its performance for years to come. Remember to clean the filters regularly and follow the manufacturer's maintenance guidelines to prevent costly repairs and downtime. If you have any questions or need assistance with your airless paint sprayer, feel free to contact us for expert advice. Don't forget to stock up on airless spray gun filters, Graco Gun Filter, Wagner Gun Filters, and other supplies from your trusted supplier to keep your sprayer in top condition.
Innovation, excellence and reliability are the core values of our business. Today, more than ever, these principles are the basis for our success as an internationally active medium-sized graco sprayer filter,New graco sprayer filter,titan gun filters company.